-
Lava Charcoal (Carved in Stone Ep. 1)
This post is talking a bit about the behind the scenes elements of the first video in my new series, Carved in Stone, named after the book I’ve been working on for the last several years. I highly recommend watching the video first, if you haven’t already, as this post assumes you’ve seen the video, and contains MAJOR spoilers!
This entire series is the most complex I’ve ever done, and it’s several years in the making if we count time spent working on the book. Ages ago, I was chatting with Brian Tyrell (writer and co-project-manager for the book) about adapting the book into various storytelling media, and we wondered if I could bring the Picts into Minecraft. I started to consider what was possible in Minecraft, as this was before we knew about the Copper Age update. Ultimately, I decided that modding the game was the best way to go. I could bring Scottish plants into the game, and take advantage of quite a few mods that bring Minecraft gameplay closer to reality, like Charcoal Pit 4.
That led me down an entire rabbit hole of learning to code for KubeJS specifically, as I don’t trust myself to make a full mod yet. I’ve got a lot of things in the game so far, but there is so much left to add or change! So I’m going to be adding/refining things as this series goes. I’m hoping to have a finished modpack at some point, but part of this series is me learning how to do all of that. In other words, it might be a while before this modpack is available for folks to play around with!
This first episode, I spawned in a village intentionally. Pictish life is frequently reliant on those around you, even in smaller settlements, so starting in the middle of nowhere wasn’t ideal. This is actually the third world I started for this series – the first one I was in a snowy village that had all of two buildings, one of which was mostly deleted from worldgen. The second world I didn’t spawn in a village, probably due to a conflicting mod! But I quite like this spawn. There’s an interesting cave/rock situation, the surrounding swamp is something I haven’t really contended with before in Minecraft (but I have Pictish plans for it), and there’s a good amount of villagers!
One concern I had was the lack of hills, but that mostly means that this settlement is more crop- and fish-focused rather than livestock. We still need livestock! But it’s not the main thing this settlement does.
The BIG problem I ran into in this episode is my current lack of iron! I have a mod that will occasionally let me find nuggets when I’m just mining stone, but that’s infrequent and could be any of the nuggets (or even gems), not just iron. It’s not super reliable!
But to light a fire in Minecraft, you usually need a flint and steel, and that requires iron. In reality, you can use friction to start a fire with some sticks, or even a bow drill. But I hadn’t coded that into the game, because I hadn’t even thought about how I’d soft-locked myself out of a flint and steel.
Charcoal Pit 4 is a great mod for many reasons, but a big one is that it forces you to make iron using methods that are closer to reality. You need to craft a bloomery and some bellows, turn your iron into a bloom, then place that in the world and work it with a pickaxe before you can get iron.
Of course, I’m quadruple checking that with the mod’s page as I write this and realising that it has a recipe for a flint and steel that only needs raw iron! 🙃
So I could have just done that… I didn’t even think to check for alternative recipes! Goodness, lesson learned.
Obviously, I didn’t realise that was an option when making this episode! There’s a lot of footage from that recording session that I edited out, because it’s boring, but I spent a LONG while trying to figure out what to do. There was a while where I worried that the entire episode was a bust, because I couldn’t get any charcoal!
And then I remembered the lava pit. I seriously need to wall it off from the villagers (I still haven’t). Originally I was going to get rid of it, but now that it was so pivotal for fire/charcoal, I’d be sad to lose it!
You have to be quick, making charcoal from lava. The log piles will burn straight through if you don’t cover them quickly, leaving you with nothing. Since you don’t know when the piles will catch, reaction times are slower. Juggling two charcoal pits with two log piles each wasn’t 100% successful, and I only tried juggling three pits once before deciding that was a net loss!
What I enjoy most about this series is that it’s forcing me to approach Minecraft in a whole new way. I’ve never thought about making charcoal from lava before, and the main time I see anyone starting fires from lava intentionally, it’s to make or light nether portals. I’ve already filmed Episode 2, and that also has a new set of things to consider – though they are significantly less flammable! I’m really excited to see what else this series throws at me, and what new Minecraft puzzles it forces me to solve.
-
Building the Nazca Lines in Minecraft
I’ve now built a few sites in Minecraft, and one thing I’ve learned is that each site is different – they all present their own challenges. Often the things you think will be difficult are actually much easier than you thought, and things that you think will be simple… aren’t so much!
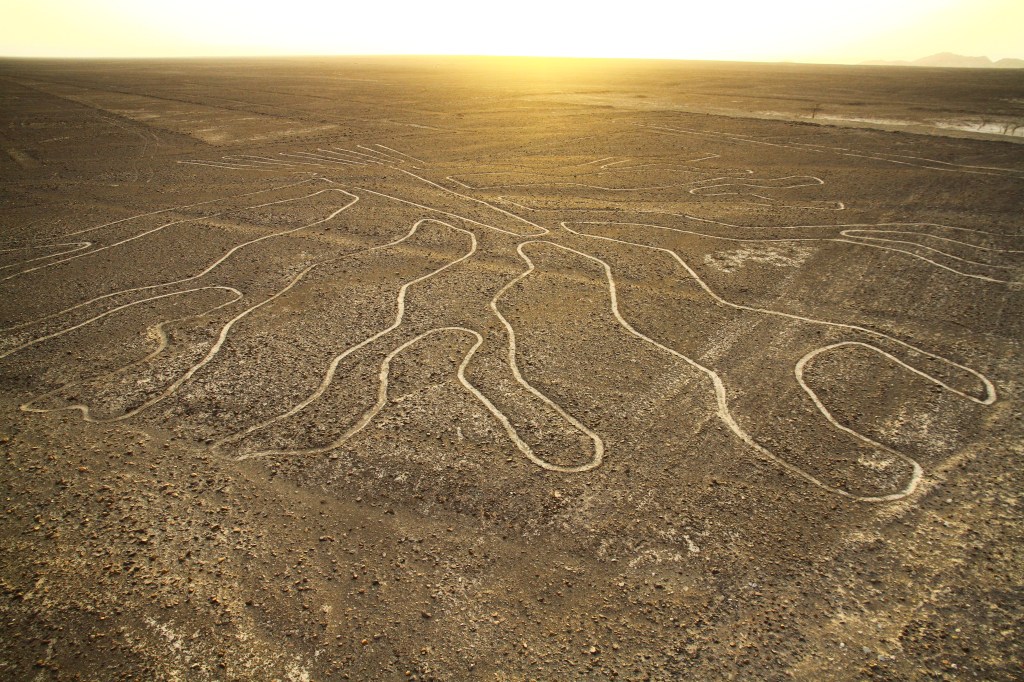
The Nazca Lines ©2020 Yasemin Olgunoz Berber/Shutterstock The Nazca Lines aren’t your typical archaeological site. They’re enormous geoglyphs in the Sechura Desert of southern Peru that cover a total area of 450km2 (170mi2). There are over 800 lines and over 70 plant and animal motifs, with still more being discovered through the use of drones and even some machine learning.
Materials
Minecraft can do a lot, but it can’t do everything. When I first thought to make the Nazca Lines, I thought I might use gravel and path blocks. Path blocks are a few pixels shorter than full blocks like gravel, so it would be a way to simulate the scraping the Nazca did without going too deep. Slabs would show that sort of depression, too, but if we think of minecraft blocks as a meter deep, slabs would be 50cm thick. The depression would be 50cm rather than 10-30cm, which is a bit too deep for what I was trying to do.

Minecraft gravel block (left) and dirt pack block (right) 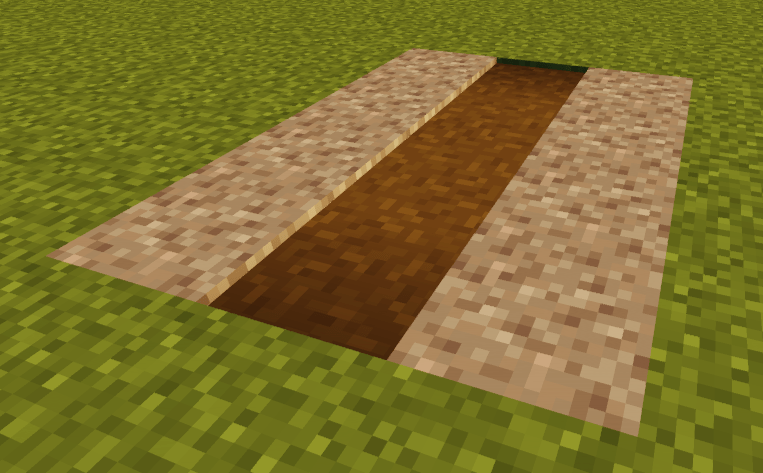
Combining gravel and dirt path blocks to make lines But there are three big problems with path blocks. First, they are a full block wide, so even though they would capture the depth of the Nazca Lines really well, they would all be a full metre wide. While some lines are up to 1.8m wide, most of the Nazca Lines are closer to 30-50cm.
Second, I would also need to put a full block between any path blocks that made up the lines in order to separate them. But the separation between most of these lines is less than a metre, or at the very least, the space taken up by two lines plus the space in between is usually far less than three metres.
And finally, the colour of the path blocks isn’t quite right for the clay and gravel found in this part of the Sechura Desert. I could have used clay and given up on the depth between blocks in favour of colour, but the same issue of the width of the line sand the spacing between them would still stand.

The iron-oxide-rich sands and gravel of the Sechura Desert ©2017 Vadim Petrakov/Shutterstock So I had two options, really – increase the scale of the designs in favour of preserving colour and material, or fudge the colour, materials and depth a bit in favour of scale.
Part of the impressiveness of the Nazca Lines is their scale. It’s a defining feature. Increasing the scale would only make them more impressive, but I didn’t want anyone thinking the real Nazca Lines were somehow less impressive simply because they are technically smaller scale than what I ended up building in Minecraft. So that’s when I had the idea to use stairs.
Stairs in Minecraft are… well, they don’t always like to behave! They join together in nice ways depending on how you orient them, but if you do that too close to another orientation of stairs, it might change everything in a way you don’t want. You can see a few times in the video where I have to play around a bit with the stairs to get them to the orientation I wanted!

Minecraft stone (left) and andesite (right) stair blocks We also don’t have that many options for stairs in Minecraft. For ones that will match the colours of a Minecraft gravel block, but don’t look like they’re individual stones lined up nicely, our options are basically andesite or stone stairs. Andesite blended in better with the gravel, so I opted for those.
Which Lines?
So I had the materials, but that’s a relatively small part of building! The next question was which of the lines to build. I thought I might do one of the straight lines, but I really wanted to get a couple of the animal forms built, since those are often the most eye-catching.
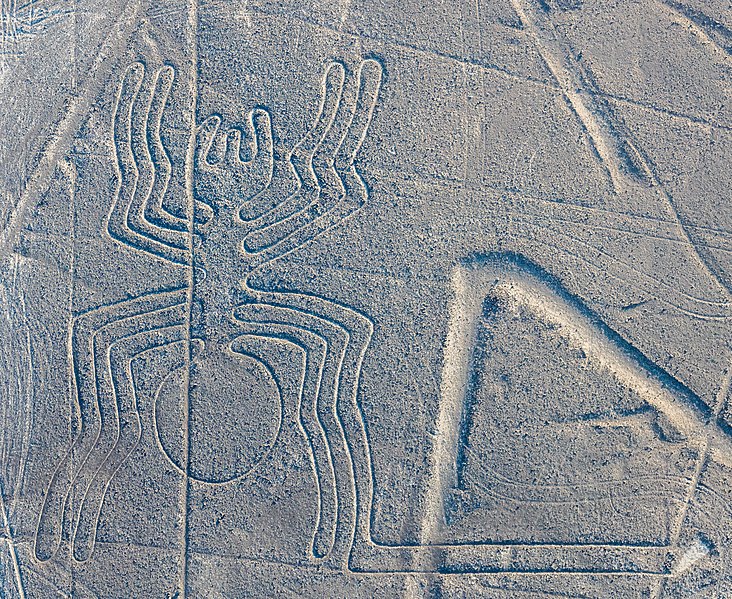
Nazca spider glyph. Image by Diego Delso. I like the Nazca spider. Honestly, that was my main reason for choosing it – it looks cool, it’s well-known, there are some really nice images of it and I thought other people would like it, too! I also thought it had a relatively simple (ish) shape that I could probably replicate in Minecraft.
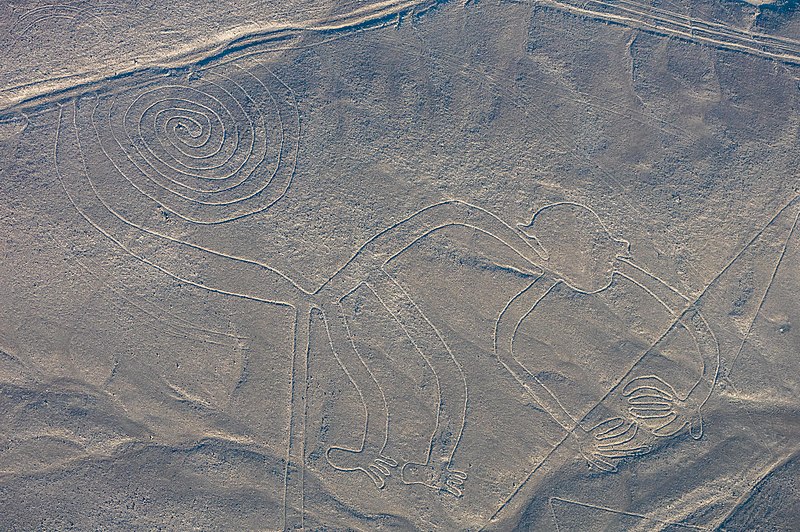
Nazca monkey glyph. Image by Diego Delso. For the second, I debated doing the monkey, which is also a very well-known glyph. The difficulty with the monkey is the spiral in the tail. I didn’t think I would be able to replicate that with stair blocks very well, at least not without the stairs misbehaving at every turn! So I instead opted for the hummingbird. The hummingbird is also a well-known glyph and is twice as long as the spider. It has more straight lines, but the feathers on the wings and the tail are also closer together. I thought it would be an interesting set of challenges that differed from the spider, but would still work in Minecraft.
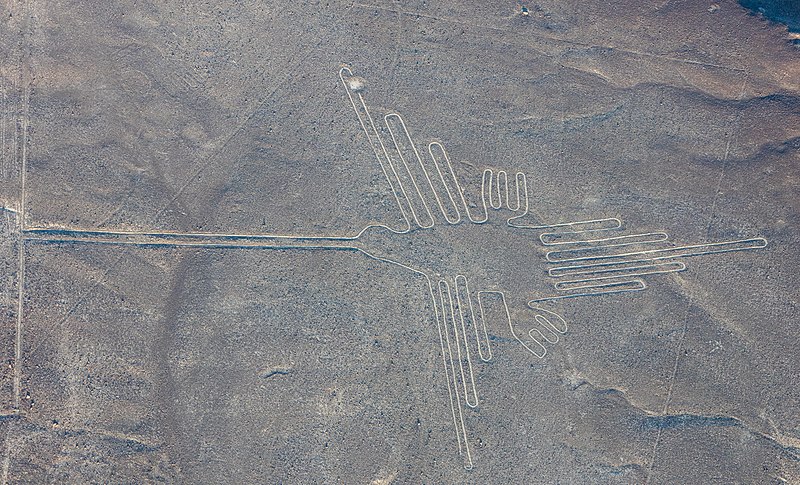
Nazca hummingbird glyph. Image by Diego Delso. How I Built the Nazca Lines in Minecraft
We know that the Nazca created their glyphs using string, sticks and basic landscaping techniques. That’s somewhat possible in Minecraft, at least if you’re working on a bigger scale. But since stairs cover half-blocks and there’s no real way to connect string between two points in the game (at least not without mods), I opted for the grid method instead.
I first went to Google Maps and looked for the Lines. Google has a scale at the bottom of every map, which you can use to measure buildings or, in this case, geoglyphs. I use Google Maps a lot in my builds, especially when trying to figure out scale!
Once I knew how large the hummingbird was supposed to be, for example, I tried to find the best orthographic or top-down photograph of the hummingbird I could so that scale was relatively consistent. I then messed around in Photoshop with the grid settings until I had created a grid that was more or less what the scale of the glyph should be, assuming each square in the grid = one block in Minecraft = one metre.
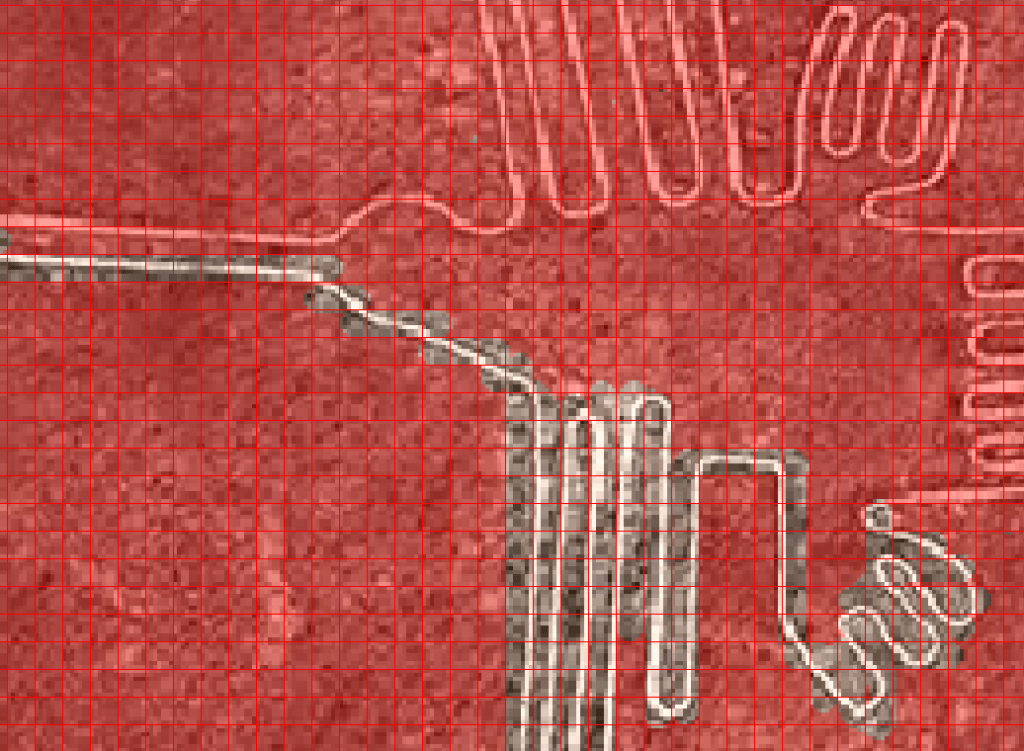
Example grid of the hummingbird glyph. Once I had that, I plotted out the area in a superflat Minecraft world and filled in every square in the grid that was just solid gravel. Once that was done, I went through and filled in the stairs, making sure to put the indent of the stairs on the half (top, bottom, left or right) of the grid taken up by the line.
Surprisingly, the only three places I really struggled with were the part of the pider’s left side legs that join with the body and the feet and tailfeathers of the hummingbird. The feet were difficult because the stairs just did not want to orient themselves in the way the lines should be oriented, and I couldn’t really separate them out further. The result in the video is the best I could manage, which I honestly think is pretty good. As for the tailfeathers on the hummingbird and the spider’s legs connecting on the left side, there’s nothing inherently difficulty about them – it was more the fact that in both cases I had been staring at lines and grids and stairs for several hours in each case, and I was having trouble following them all!
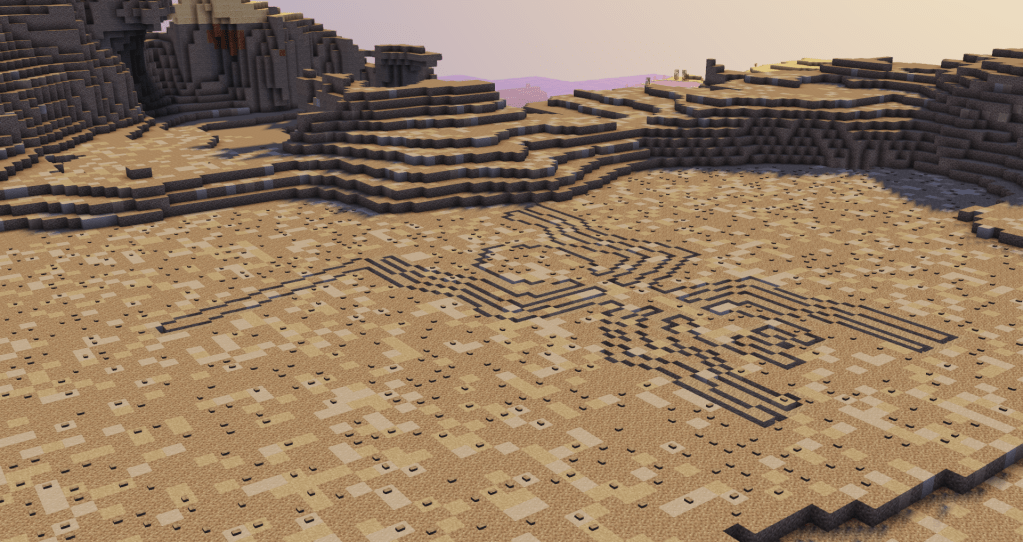
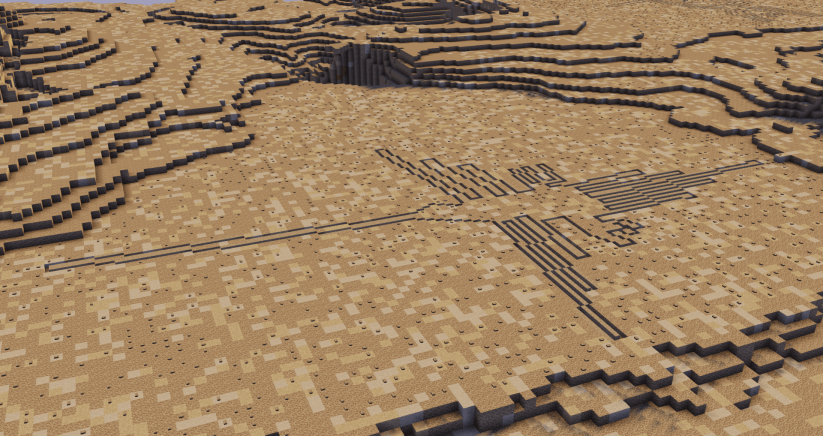
Nazca spider glyph in Minecraft 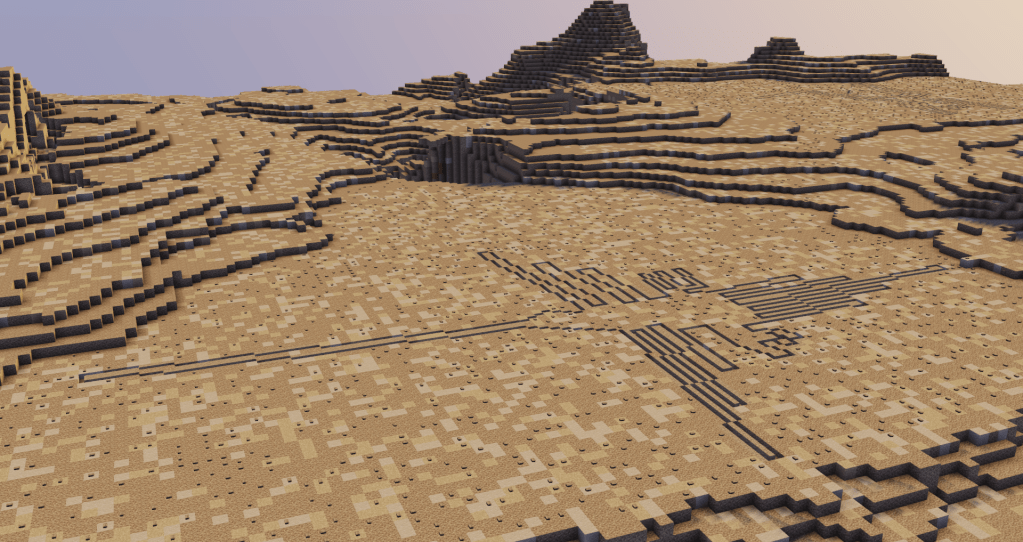
Nazca hummingbird glyph in Minecraft
So that’s how I did it! Part of me feels like I should have included one of the straight lines afterall, but the biomes in Minecraft aren’t that large and the ones that appear near either the hummingbird or the spider tend to actually pass through them, and I didn’t have away of representing that well. But all in all, I’m quite please with both my spider and my hummingbird – and I’ve absolutely learned a lot about working with Minecraft stairs!
If you want to learn a bit more about the history of the Nazca Lines and see what it’s like to walk around the finished product in Minecraft, have a look at my video:
-
I Need Sleep! (Archaeologist’s Guide to Minecraft Diary, Ep. 2)

This is part of a solo journaling RPG exercise that takes my gameplay from my Archaeologist’s Guide to Minecraft series on YouTube and writes about the experience from the perspective of my character in the game. If you’d like to see the gameplay, too, check out the link to the episode at the end of the post!
Day 2
Well, the night passed and no monsters came into my little hiding spot here, so that’s good! There are almost certainly monsters outside – I heard them in the night, though I suppose some might have burned in the sunlight. I’m not super sure why they do that, but I’m definitely also not going to question it.
I need sleep. I didn’t sleep all night because monsters, so I need a bed. A village would be cool, too, but even just some sheep for some wool would be nice!
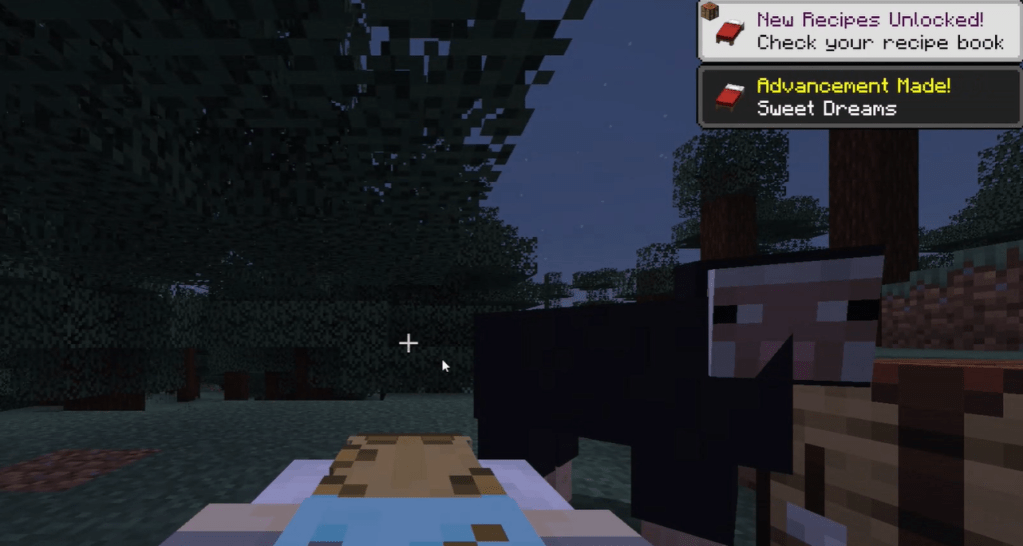
Surprisingly there were no monsters outside my little hovel, and my goodness… I hadn’t seen the view in my panic to make a safe place to spend the night and this is just… it’s gorgeous. If I don’t find a village, I might just come back here. I could wake up to this view pretty happily, I think.
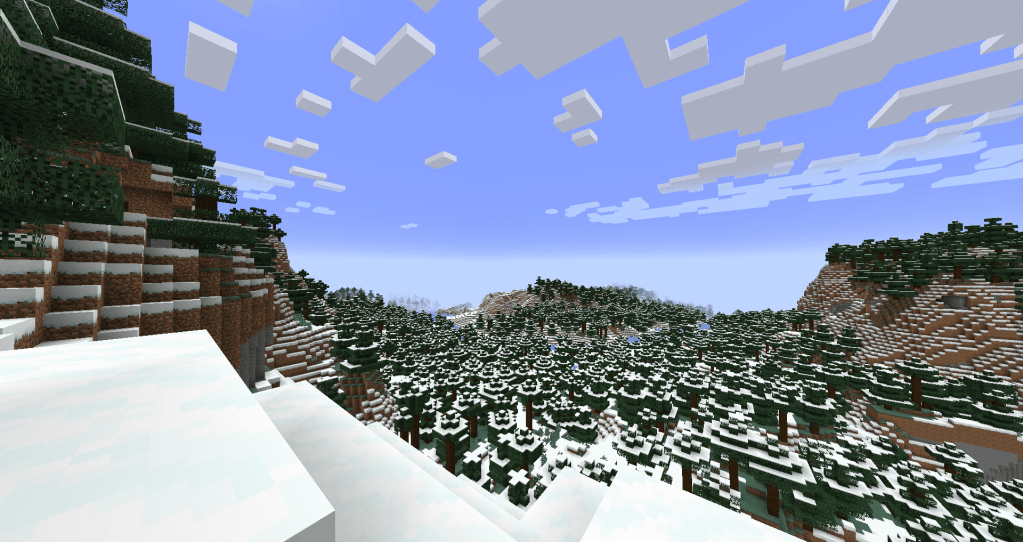
This view, though!
Sheep are in scarce supply. I came across a polar bear, which was a touch alarming! We don’t have polar bears in the wild where I’m from, and I’ve heard they can be dangerous. I’ll keep my distance, but this one seems okay with me (though I wouldn’t want to get closer).
I’ve also found some rabbits on the hillside, but I can’t make a bed out of their hides. They’re cute, though! It’s nice to see them here – I don’t remember rabbits in our hills back home.
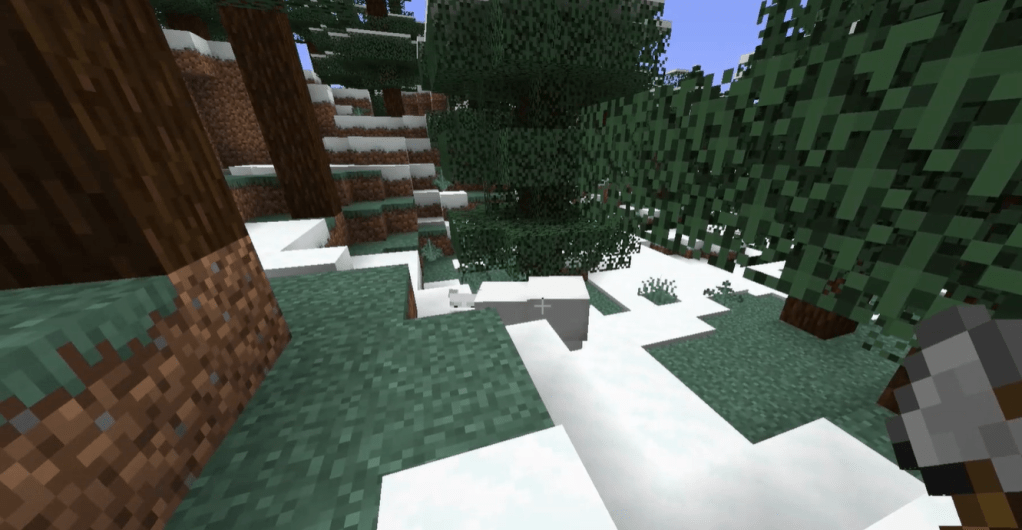
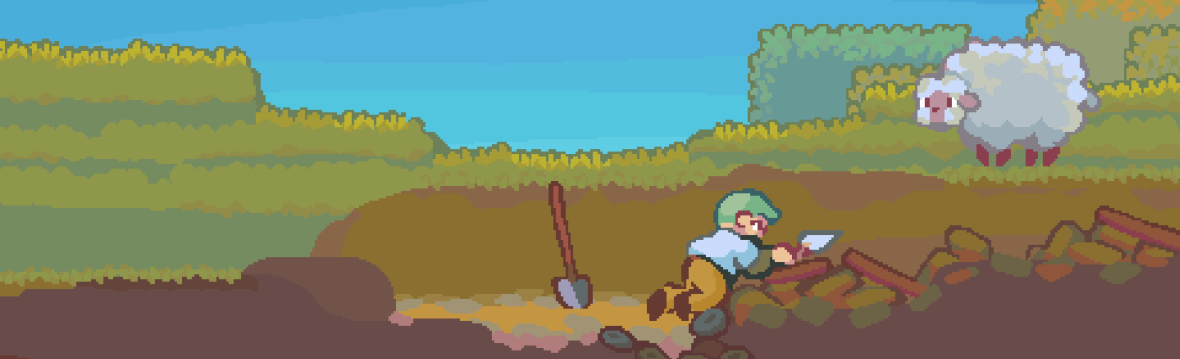
Well, hello there… don’t mind me…
I’ve finally found a sheep on top of a hill after searching nearly all day, but there’s only one, and I need more wool to make a bed! I feel badly just taking the one sheep, though I suppose it’s no different than if I found them in a group. I’d much rather find a village, to be honest, but needs must. Sorry sheep. Hopefully I can find more soon.
There’s a beehive on top of this hill, too, which might be useful in the future – I’d like to set up a small greenhouse for flowers and honey, so I’ll keep it in mind as we go.
More sheep! Seems like the rest of the herd were just down at the bottom of the hill. It’s a good thing, too, since it’s starting to get dark. Sorry sheep, but again, needs must.
I don’t like sleeping out in the open, but it works in a pinch! Don’t ask why the monsters don’t attack people in beds, even out in the open. I don’t really understand it either.
Goodnight sheep, don’t mind me… really sorry about your friends… Day 3
I didn’t find a village, and I don’t like sleeping out in the open, so I think I’m going to head back to that hillside where I spent my first night. I think I can turn that into a nice little base of operations for myself as I figure out a bit more about this place (and hopefully how/why I ended up here).
It didn’t take the entire day to get back, since I could make a bit of a beeline, but it still took most the day. I think I’ll just sleep for now and maybe get started on building a better shelter in the morning.
-
An Unexpected Circumstance (Archaeologist’s Guide to Minecraft Diary, Ep. 1)

This is part of a solo journaling RPG exercise that takes my gameplay from my Archaeologist’s Guide to Minecraft series on YouTube and writes about the experience from the perspective of my character in the game. If you’d like to see the gameplay, too, check out the link to the episode at the end of the post!
Day 1

I’m not sure what’s happened. Suddenly I’m on some sort of beach, with snow and trees everywhere… I don’t know where I am or how I got here, which isn’t good. I don’t know where I came from – also not good.
Maybe I came from somewhere along the river? And my boat… broke? But surely there’d be some sign of that – like debris or something washed up on shore.
Somehow I’m dressed for the weather, so that’s helpful. And I’m not soaked through… also helpful, but maybe that means I didn’t come from the river. But if I didn’t come from the river, how’d I get here?
Right, I need food, I need shelter, and I need some way of surviving. Maybe there’s a village nearby?
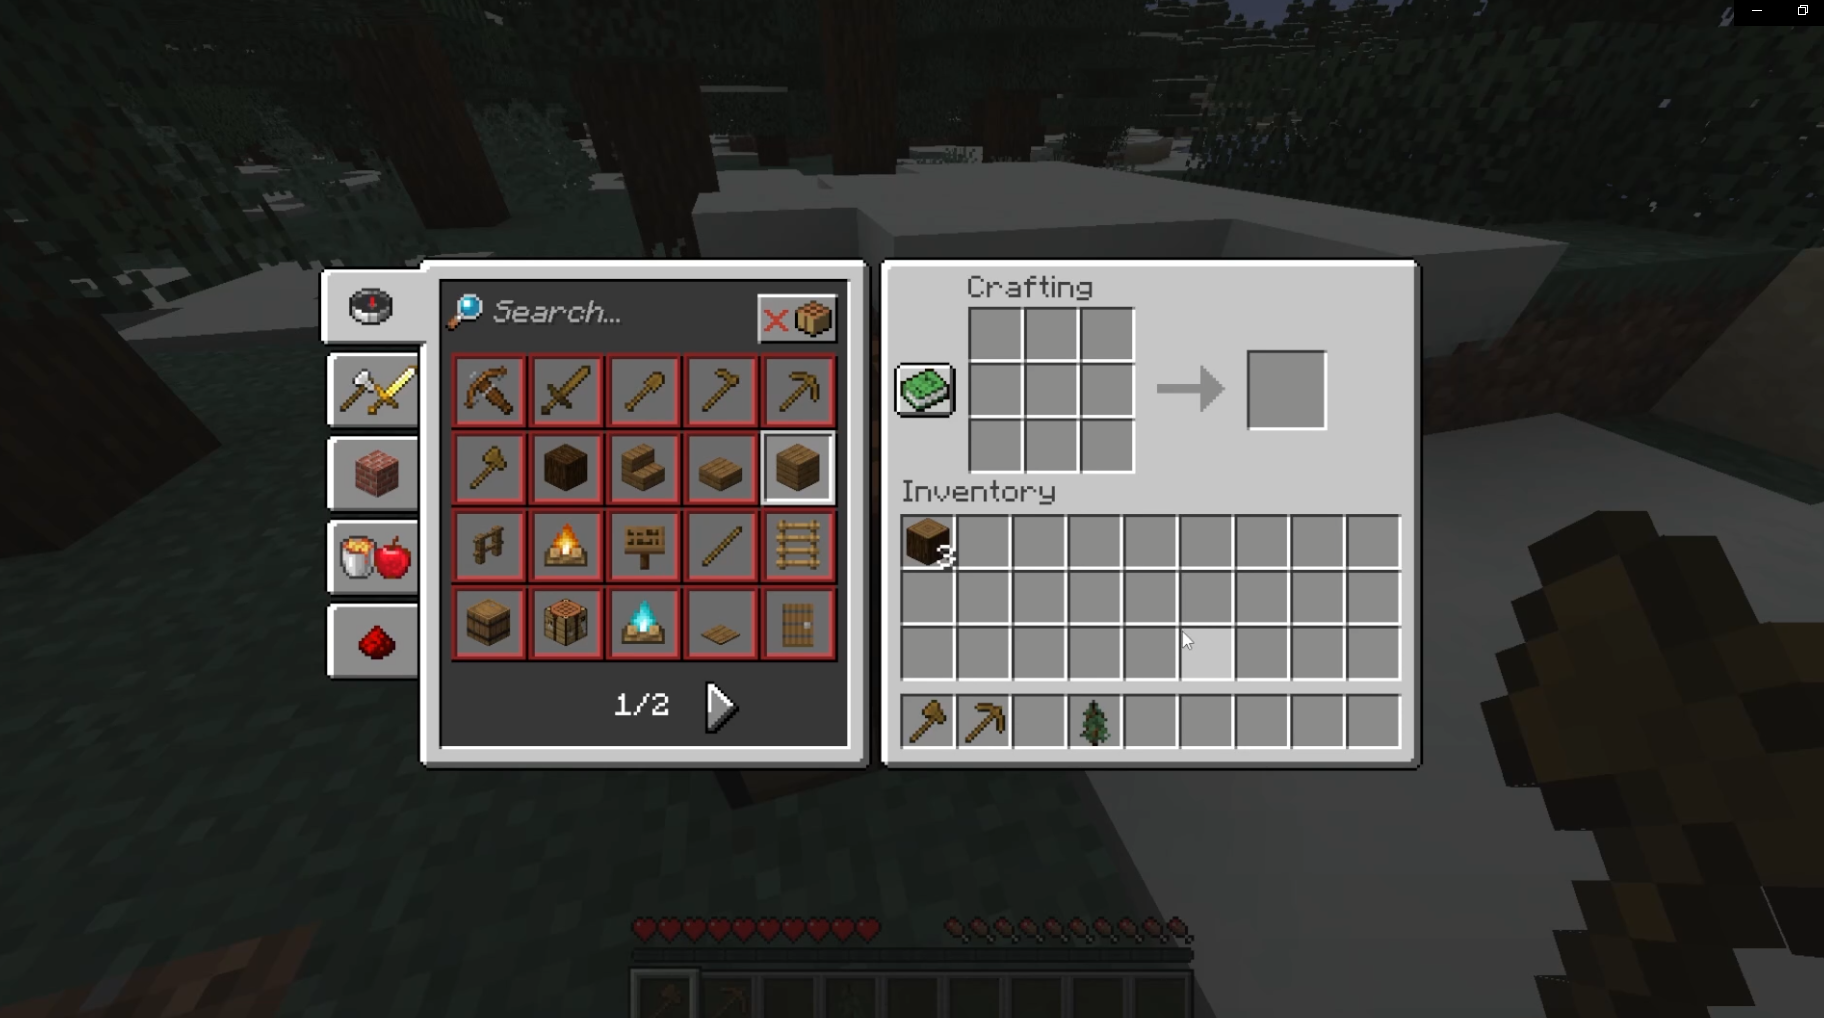
Let’s get some tools first. Could be something hostile between me at the nearest village, or there might not be a village nearby at all. Better safe than sorry.
I’m not a fan of wooden tools. I’ve used them a bit, but I always prefer at least stone. Iron’s much better. Some folk I’ve met in the past have used diamond, but diamond tools are a bit expensive… or were, at least. I suppose I have no idea how easy it is to get diamond tools here. But I don’t quite have access to stone yet, so a wooden axe and pickaxe it is.
I managed to find a ravine, which is great for upgrading my tools, but I lost my footing and fell down into the thing – definitely not my finest moment! I did get enough stone for the tools and also a furnace, which is helpful (lots of stone in a ravine). Also made a shovel – I figured it’d help for getting out of this mess. I’m a bit injured, for anyone who’s wondering, but I think my pride is more hurt than my legs.
There’s also a lot of copper in this area, which is good to know. I’ve never known much use for copper myself outside things like spyglasses or lightning rods. Some folk like to melt it into blocks to build things out of, which I might try if I can survive long enough. But for now I’ve just gotten a few chunks of the raw stuff – if I want more, it seems like I can get it pretty easily here.

Definitely annoyed at myself for this one…
There’s a wolf pack that roams the area – I’ve seen them wandering in an out of the trees. Good to know as a possible threat, but I’m wondering if I might also be able to tame a few. It’d be nice to have some company, and also some protection. I also found a patch of pumpkins and some brown mushrooms, so I took a couple to start my own garden (hopefully). I didn’t want to take the entire patch – I’m a big believer in only taking what you need and replanting what you can – but I have enough to start a garden myself.
I’ve been trying to find some higher ground to spot a town or a village or something nearby, but no luck. On the village, that is – I’ve definitely found higher ground. There were some cows around, but that was about it – couldn’t even find some sheep to make a bed.
The sun is setting.
Where I come from, at least, monsters come out at night. My town is pretty well-protected – we have a lot of light along the streets and outdoor spaces, and there are walls around with guards to keep the skeletons and zombies and such away. But outside those walls, out in the wilderness, it’s a different story. I don’t know if monsters also threaten these lands after sunset, but I’d rather not be somewhere vulnerable when I find out.

Not the finest shelter I’ve ever built, but it’ll do for now. I’ve quickly dug a small hole into the nearby hill. I don’t have a bed, as I said, but hopefully I can wait out the night in relative safety here. It’d be nice to find a village tomorrow, or at least some sheep. But if not, I might just need to find a spot to call my own and try my best to survive.
Combining gaming and archaeology/anthropology – what could possibly go wrong?
